Creating the Perfect Chicken Dust Bath: A 2-Minute DIY for Your Homestead

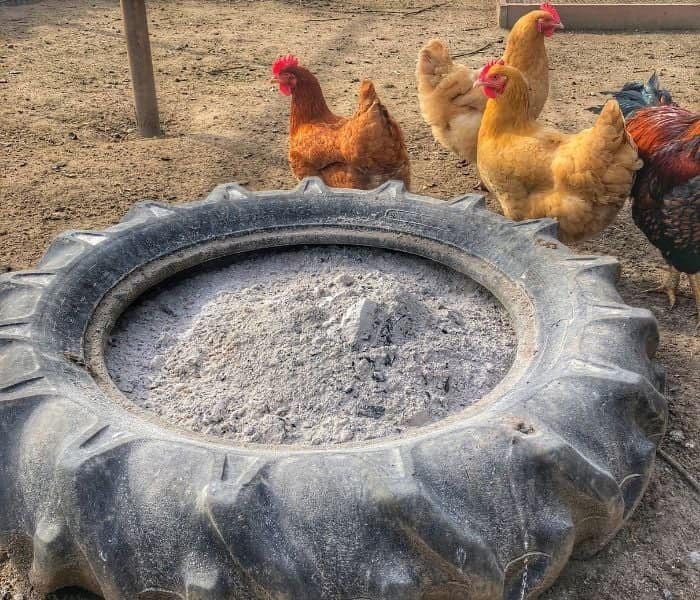
Over the years I’ve learned that one of the most important, yet often overlooked, aspects of chicken care is providing a designated chicken dust bath. These shallow depressions filled with a special blend of materials allow your feathered flock to engage in a natural, instinctual behavior that is essential for their health and well-being.
You see, chickens don’t have the luxury of regular baths like we do. Instead, they rely on the process of dust bathing to clean and maintain their plumage. By rolling around in a mixture of fine, dry materials, chickens can rid their feathers of excess oils, parasites, and other unwanted debris. It’s a crucial part of their grooming routine, and one that you, as a responsible chicken keeper, should be sure to accommodate.
Fortunately, creating the perfect chicken dust bath is a quick and easy project that requires minimal time and effort. In this comprehensive guide, I’ll walk you through the step-by-step process of constructing a simple, yet effective dust bath for your backyard flock. Whether you’re a seasoned homesteader or a newcomer to chicken-keeping, you’ll be equipped with the knowledge and confidence to provide your feathered friends with this essential element of their care.
So, let’s dive in and learn how to craft the ultimate chicken dust bath in just two minutes flat!

The Benefits of a Chicken Dust Bath
Before we get into the nitty-gritty of building your chicken dust bath, let’s first explore the many benefits this simple feature can provide for your flock:
Feather and Skin Health
By rolling around in a dust bath, chickens can remove excess oils, dirt, and parasites from their feathers and skin. This helps to keep their plumage in top condition and prevents the buildup of harmful bacteria or pests.
Parasite Control
The fine, abrasive materials in a dust bath can help to dislodge and remove external parasites, such as mites and lice, that can otherwise cause discomfort and health issues for your chickens.
Stress Relief
Dust bathing is a natural, instinctual behavior for chickens, and providing them with a designated area to indulge in this activity can help to reduce stress and promote overall well-being.
Improved Immune Function
The act of dust bathing can actually help to strengthen a chicken’s immune system, as the process of rolling and fluffing their feathers helps to distribute beneficial oils and minerals throughout their plumage.By understanding the importance of a chicken dust bath and the many benefits it can provide, you’ll be well on your way to creating a happier, healthier flock on your homestead.

Gathering the Necessary Materials
Now that you’re convinced of the value of a chicken dust bath, let’s talk about the materials you’ll need to create one. Fortunately, the list is quite short, and you may even have most of the items on hand already:
- A shallow container or a hole in the ground (a repurposed tub or kiddie pool also works great)
- A mixture of fine, dry materials such as:
- Dirt or sand
- Diatomaceous earth (food-grade)
- Ash or wood ash
- Crushed eggshells
- Optional: Herbs or essential oils (such as lavender or rosemary) for added pest-repelling properties
The key is to create a blend of materials that are dry, fine-textured, and slightly abrasive, allowing your chickens to effectively clean and condition their feathers.
Step-by-Step Instructions for Building a Chicken Dust Bath
Now that you have your materials ready, let’s get to work on constructing your chicken dust bath. This entire process can be completed in just two minutes, making it a quick and easy addition to your homestead:
- Choose a Location: Select a spot in your chicken run or coop that is well-ventilated, protected from the elements, and easily accessible for your flock. Avoid areas that are prone to mud or standing water.
- Create the Base: If using a container, simply place it in the desired location. If creating a hole in the ground, use a shovel to dig a shallow, bowl-shaped area, about 6-12 inches deep.
- Add the Dust Bath Mixture: Fill the container or the hole with your prepared blend of fine, dry materials. Aim for a depth of 4-6 inches, allowing your chickens to fully immerse themselves.
- Incorporate Optional Ingredients: If desired, sprinkle a handful of crushed eggshells or a few drops of essential oils (such as lavender or rosemary) throughout the dust bath mixture to provide additional benefits.
- Encourage Usage: To entice your chickens to use the new dust bath, you can gently toss a handful of the mixture into the air, allowing it to settle back down onto the surface.
And just like that, your chicken dust bath is complete! Be sure to monitor the usage and condition of the dust bath, replenishing or refreshing the materials as needed to keep it in optimal condition for your feathered flock.

Tips and Tricks for Dust Bath Success
As you integrate this essential feature into your homestead, here are a few additional tips and tricks to ensure your chicken dust bath is a resounding success:
- Provide Multiple Baths: Consider creating multiple dust bath stations around your chicken run or coop to accommodate your entire flock and prevent overcrowding.
- Rotate Locations: Periodically move the dust bath to a new spot to prevent the buildup of waste and maintain a fresh, clean environment.
- Monitor for Pests: Keep an eye out for any signs of mites or other parasites, and be prepared to treat the dust bath and your chickens if necessary.
- Experiment with Ingredients: Don’t be afraid to try different blends of materials to find the perfect combination that your chickens love. This guide from the University of Florida offers some great suggestions.
- Provide Shade: If your dust bath is located in a sunny area, consider adding a small shade structure to prevent the materials from drying out too quickly.
- Maintain Cleanliness: Regularly remove any wet or soiled materials from the dust bath and replenish with fresh, dry ingredients to keep it in optimal condition.
By following these tips and tricks, you’ll be well on your way to creating a thriving, well-utilized chicken dust bath that will keep your feathered flock happy, healthy, and free of pesky parasites.
Frequently Asked Questions about Chicken Dust Baths
Q: How often should I refresh the dust bath materials?
A: The frequency will depend on the size of your flock and how often the dust bath is used, but generally, you’ll want to replenish the materials every 1-2 weeks, or whenever the mixture starts to look soiled or damp.
Q: Can I use regular potting soil in the dust bath?
A: Potting soil is generally not recommended, as it may contain additives or fertilizers that could be harmful to your chickens. Stick to natural, unprocessed materials like dirt, sand, and ash.
Q: Do I need to provide a dust bath for my chickens if they have access to a dirt run?
A: Even if your chickens have access to a dirt run, providing a designated dust bath can be beneficial, as it gives them a specific area to engage in this natural behavior.
Q: How big should the dust bath be?
A: The size of the dust bath will depend on the size of your flock, but a good rule of thumb is to provide a bath that is at least 2-3 feet wide and 6-12 inches deep, allowing multiple chickens to use it at once.
Q: Can I use the same dust bath materials for multiple flocks?
A: It’s generally best to start with fresh materials for each new flock to prevent the spread of any potential diseases or parasites. Thoroughly clean and disinfect the dust bath container before refilling.
Address these common questions and you’ll be well-equipped to create and maintain a chicken dust bath that will keep your feathered friends happy and healthy on your homestead.


