How to Ferment Vegetables Step by Step: A Beginnerâs Guide
We’re excited to share how to ferment vegetables with you! It’s a simple process that can add amazing flavor and health benefits to your food. We’ll walk you through everything step-by-step, so even if you’ve never done it before, you’ll be making delicious fermented treats in no time. Get ready to transform your kitchen!
Key Takeaways
- Gather your supplies: You’ll need fresh vegetables, salt, and clean jars.
- Choose your veggies: Many vegetables can be fermented, like cabbage, carrots, and cucumbers.
- Prepare your brine: A simple salt and water solution is usually all you need.
- Pack your jars: Layer your vegetables and brine, making sure they stay submerged.
- Be patient: Fermentation takes time, but the results are worth the wait.
Getting Started With Fermenting Vegetables

So, you’re thinking about diving into the world of fermenting vegetables? Awesome! It’s a really rewarding process, and honestly, not as complicated as it might seem. We’re going to walk you through everything you need to know to get your first batch going. Think of it as a culinary adventure right in your own kitchen.
What You’ll Need To Ferment Vegetables
Before we get our hands dirty, let’s talk about the gear. You don’t need a whole lot to start, which is great news for your wallet and your kitchen space. The most important things are:
- Jars: Glass jars are your best friend here. Mason jars work perfectly, but any sturdy glass jar with a lid will do. Make sure they’re clean!
- Salt: We’re talking about non-iodized salt, like sea salt or kosher salt. Iodine can mess with the fermentation process, so stick to the plain stuff.
- Vegetables: Obviously! We’ll get to choosing these in a bit.
- Weight: You need something to keep your veggies submerged under the brine. This could be a fermentation weight, a smaller jar filled with water, or even a clean rock.
- Airtight Lid or Air Lock: This is key to keeping the bad stuff out and letting the good stuff happen. Some lids have special airlocks, or you can just use a regular lid, burping it occasionally.
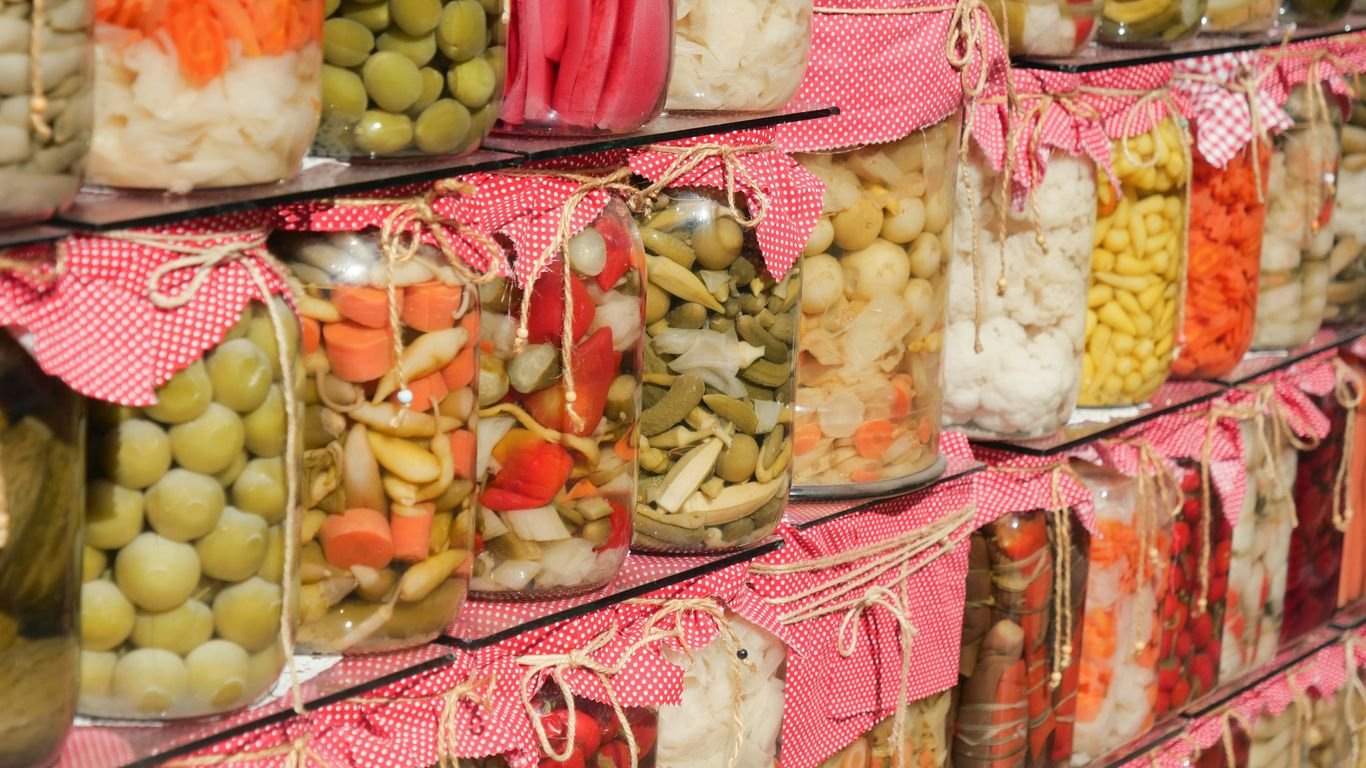
Choosing Your Vegetables For Fermentation
This is where the fun really begins! Pretty much any vegetable can be fermented, but some are definitely more beginner-friendly than others. We like to start with:
- Cabbage: The classic for sauerkraut. It’s sturdy, readily available, and ferments beautifully.
- Carrots: Great on their own or mixed with other veggies. They get a lovely sweet and tangy flavor.
- Cucumbers: Hello, pickles! They’re a crowd-pleaser and relatively quick to ferment.
- Radishes: These add a nice peppery kick to your ferments.
When you’re picking your veggies, aim for fresh, firm produce. Organic is always a good choice if you can find it, but the most important thing is that they’re good quality.
Understanding The Fermentation Process
So, what’s actually happening in that jar? Fermentation is basically a way of preserving food using microorganisms, like bacteria and yeast. We’re not talking about the spoilage kind of bacteria here; we’re talking about the good guys. These beneficial microbes feast on the sugars in the vegetables and produce lactic acid. This lactic acid is what gives fermented foods their signature tangy flavor and also acts as a preservative, keeping the bad bacteria at bay.
The magic happens when we create an environment where these good microbes can thrive. This usually means keeping the vegetables submerged in a saltwater brine, which limits oxygen and encourages the lactic acid bacteria to get to work. It’s a natural process that’s been used for centuries to preserve food and make it even more nutritious.
It’s a pretty neat biological process, and the best part is, you get to eat the delicious results!
The Basic Steps To Fermenting Vegetables
Alright, let’s get down to business! You’ve got your veggies, you’ve got your jars, and now it’s time to actually do the thing. Fermenting isn’t some mystical art; it’s pretty straightforward once you break it down. We’ll walk you through the core steps so you can get your first batch bubbling away.
Preparing Your Vegetables
First things first, we need to get our veggies ready. This usually involves washing and chopping them up. For things like cabbage, we might shred it or cut it into chunks. Root vegetables can be julienned or sliced. The goal here is to create pieces that will fit nicely into your jar and allow the brine to penetrate them evenly. We also want to make sure they’re clean, but don’t go overboard with sanitizing. A good rinse under cool water is usually all that’s needed. Remember, we’re encouraging good bacteria, not trying to sterilize everything.
Creating Your Brine Solution
This is where the magic really starts. Most vegetable ferments use a simple brine, which is just salt and water. The salt is super important – it pulls water out of the vegetables, creating its own liquid, and it also helps to suppress the growth of bad bacteria while letting the good ones thrive. We usually aim for a salt concentration between 2% and 5% of the water’s weight. A common ratio is about 1 to 2 tablespoons of non-iodized salt (like sea salt or pickling salt) per quart (about 1 litre) of water. We’ll mix this up until the salt is fully dissolved. Some recipes might add other things to the brine, like spices or herbs, but for the basic method, salt and water are your best friends.
Here’s a quick guide for brine ratios:
| Salt Percentage | Salt per 1 Litre Water |
|---|---|
| 2% | 20g (approx. 1.5 tbsp) |
| 3% | 30g (approx. 2 tbsp) |
| 5% | 50g (approx. 3.5 tbsp) |
Packing Your Jars For Fermentation
Now for the fun part: packing! We’ll take our prepared vegetables and pack them tightly into our clean jars. It’s important to pack them down firmly to remove as much air as possible. This helps create an anaerobic environment, which is what we want for proper fermentation. You can use your hands, a tamper, or even a clean muddler. Once the jar is packed, we’ll pour our brine solution over the top, making sure the vegetables are completely submerged. If there isn’t enough brine from the vegetables themselves, we’ll top it up with our prepared salt water. The key is to keep everything below the brine level. We might use a fermentation weight or a piece of cabbage leaf to help keep things submerged. Then, we’ll put on a lid – either a regular lid screwed on loosely, or a specialized fermentation lid that allows gases to escape. And that’s it! Your jar is ready to start its fermentation journey.
We’re aiming to create an environment where lactic acid bacteria can do their thing. These beneficial microbes are naturally present on the vegetables. They consume sugars in the vegetables and produce lactic acid, which preserves the food and gives it that characteristic tangy flavor. Keeping everything submerged and minimizing air exposure helps these good guys win the competition against spoilage organisms.
What To Expect During Fermentation
So, you’ve packed your jars and are waiting. What’s actually happening in there? It’s a bit like a tiny, delicious science experiment. We’re creating an environment where good bacteria can thrive and do their thing, which is basically to preserve the vegetables and make them taste amazing.
Signs Your Vegetables Are Fermenting
How do we know it’s working? Keep an eye out for a few key indicators. The most obvious sign is activity. You’ll likely see bubbles forming and rising to the surface. This is the natural byproduct of the fermentation process, as the bacteria consume sugars and release gases. You might also notice a cloudy brine. Don’t panic! This cloudiness is usually a sign of healthy bacterial growth. The smell will also change; it should develop a pleasant, slightly sour aroma, not a foul or rotten one.
Here are some common signs to look for:
- Bubbling: This is the most active sign that fermentation is underway.
- Cloudy Brine: The liquid may become opaque as bacteria multiply.
- Sour Aroma: A tangy, pleasant smell indicates successful fermentation.
- Surface Scum: Sometimes a thin layer of white film can appear on the surface. This is usually harmless and can be skimmed off. Learn about fermentation issues.
Troubleshooting Common Fermentation Issues
Sometimes, things don’t go exactly as planned. It’s pretty normal, especially when you’re starting out. One common issue is mold. If you see fuzzy mold, especially if it’s green or black, it’s usually a sign that too much air got into the jar or your salt concentration wasn’t quite right. You’ll likely need to discard that batch and start over, making sure your jar is properly sealed next time. Another thing to watch for is a lack of activity. If you see no bubbles and no change in smell after a few days, your brine might be too weak, or the temperature might be too cold for the bacteria to get going.
The Role Of Salt In Fermentation
Salt is more than just a flavor enhancer here; it’s a critical player. It helps to draw out water from the vegetables, creating the brine, and it selectively favors the growth of beneficial lactic acid bacteria while inhibiting the growth of spoilage microbes. Getting the salt ratio right is key. Too little salt and you risk spoilage; too much and you might slow down or stop fermentation altogether. We usually aim for about 2% salt by weight of the vegetables and water combined. This might seem like a small amount, but it makes a big difference in the final outcome of your fermented goods.
Storing And Enjoying Your Fermented Vegetables

So, you’ve gone through the whole process, and now you have jars full of bubbly, tangy goodness. What’s next? It’s time to enjoy the fruits (or veggies!) of your labor. Knowing when your ferments are ready and how to keep them tasting great is key.
Knowing When Your Ferments Are Ready
Figuring out if your fermented veggies are done is more art than exact science, but there are some good signs to look for. The most obvious is taste. You’re looking for that pleasant sourness that comes from the lactic acid bacteria doing their thing. It shouldn’t taste rotten, but it should definitely have a tang. Another sign is the texture. They should be tender but still have a bit of a bite, not mushy. If you’re making something like sauerkraut or kimchi, you’ll often see bubbles during the active fermentation phase. Once that bubbling slows down significantly, it’s usually a good indicator that fermentation is winding down.
Here’s a quick rundown:
- Taste: Tangy, sour, but still fresh. Not unpleasant or overly sharp.
- Texture: Crisp-tender, with a slight crunch. Avoid anything mushy.
- Appearance: Vibrant colors, and the brine should be cloudy. Bubbling usually subsides when fermentation is nearing completion.
- Smell: Pleasantly sour, like vinegar or yogurt, not foul or off-putting.
Proper Storage For Fermented Foods
Once your ferments have reached that perfect point, it’s time to slow down the fermentation process. The best way to do this is by moving them to the refrigerator. Cold temperatures significantly slow down the activity of the bacteria, preserving the flavor and texture you worked so hard to achieve. Always make sure your ferments are submerged in their brine before sealing the jar. If needed, you can use a smaller jar or a weight to keep everything below the liquid line. This is super important because exposure to air can lead to spoilage and unwanted mold growth.
Storing your ferments in the fridge in airtight containers is the best way to keep them tasting great for weeks, or even months. Always ensure the vegetables are covered by brine to prevent spoilage.
Most ferments, when stored properly in the fridge, can last for several months. Some, like well-made sauerkraut, can even last up to a year if kept consistently cold. Just remember to always use clean utensils when taking food out of the jar to avoid introducing new bacteria.
Creative Ways To Use Fermented Vegetables
Don’t just eat them straight from the jar (though that’s totally fine too!). Fermented vegetables are incredibly versatile. They can add a fantastic punch of flavor and beneficial probiotics to so many dishes. Think about adding chopped kimchi to fried rice or scrambled eggs. Sauerkraut is amazing on sandwiches, sausages, or even blended into a salad dressing. Pickled carrots or radishes can be a crunchy topping for tacos or grain bowls. We even like to add a spoonful of brine to salad dressings for an extra zing!
Here are a few ideas to get you started:
- Sandwich & Wrap Booster: Layer sauerkraut or pickles onto your favorite sandwiches and wraps.
- Salad Enhancer: Chop up fermented veggies and mix them into your salads for added texture and tang.
- Garnish Powerhouse: Use fermented radishes, carrots, or onions as a topping for tacos, burgers, or grain bowls.
- Flavorful Sides: Serve a small dish of fermented vegetables alongside any meal for a probiotic-rich side.
- Brine Magic: Don’t toss that brine! Use it in salad dressings, marinades, or even as a base for a savory drink.
Exploring Different Fermentation Techniques
Now that we’ve got the basics down, let’s talk about some fun ways we can branch out with our fermentation adventures. While the basic principles of salt, time, and anaerobic conditions remain the same, the ingredients and methods can lead to a whole world of flavors and textures.
Making Sauerkraut: A Classic Ferment
Sauerkraut is probably one of the most well-known fermented foods, and for good reason. It’s incredibly simple to make and tastes amazing. All you really need is cabbage and salt. We like to use green cabbage, but red cabbage works too and gives you a beautiful pink hue.
Here’s a quick rundown:
- Shred your cabbage: The finer you shred it, the quicker it will soften and release its juices.
- Massage with salt: Add a good pinch of salt (about 1.5-2% by weight of the cabbage) and really get in there and massage it. This helps break down the cell walls and draw out the liquid.
- Pack it tight: Stuff the salted cabbage into your clean jar, pressing down firmly to remove air pockets and encourage the brine to rise above the cabbage.
- Weight it down: Use a fermentation weight or a smaller jar filled with water to keep the cabbage submerged. This is key to preventing mold.
- Wait and watch: Let it sit at room temperature for at least a week, or longer, depending on how sour you like it. You’ll see bubbles forming, which is a good sign!
Crafting Kimchi: Spicy and Flavorful
Kimchi is a Korean staple that takes fermentation to a whole new level of complexity and spice. While traditional kimchi can involve a lot of ingredients and steps, we can simplify it for home cooks. The base is usually napa cabbage, but radishes, cucumbers, and other vegetables can also be used.
The magic of kimchi comes from its paste, often called gochugaru paste, which includes Korean chili flakes (gochugaru), garlic, ginger, and sometimes fish sauce or shrimp paste for that umami kick. The process is similar to sauerkraut – salting the cabbage to draw out water, then mixing it with the paste and packing it into jars. It ferments a bit faster than plain sauerkraut, often ready in just a few days to a week.
Other Vegetable Fermentation Ideas
Don’t stop at cabbage! The world of fermented vegetables is vast and exciting. We’ve had great success with:
- Fermented Carrots: Sliced or julienned, carrots ferment beautifully with a touch of ginger and garlic.
- Pickled Beets: Earthy and slightly sweet, fermented beets are a vibrant addition to any meal.
- Green Beans: These can be fermented into a tangy, crisp "dilly bean" style treat.
- Mixed Vegetable Relishes: Combine things like cauliflower florets, bell pepper strips, and onions for a colorful and flavorful ferment.
The key to experimenting is to start simple and pay attention to the brine. If your vegetables aren’t fully submerged, you risk spoilage. Always use clean equipment and good quality salt. Don’t be afraid to taste as you go – that’s part of the fun!
Remember, fermentation is a living process. What you’re doing is encouraging beneficial bacteria to do their work, transforming simple vegetables into something more complex and delicious. So grab some jars, get creative, and enjoy the journey!
So, What’s Next?
And there you have it! We’ve walked through the basics of fermenting vegetables, and hopefully, you’re feeling ready to give it a shot. It might seem a little strange at first, seeing those jars bubbling away, but trust us, the results are totally worth it. You’ll end up with some seriously tasty, good-for-you food that you made yourself. Don’t be afraid to experiment with different veggies and spices. The best part about fermenting is that it’s pretty forgiving. So go ahead, grab some jars, and let’s get fermenting!
Frequently Asked Questions
What exactly is fermentation?
Fermenting is like a magic trick for food! We use tiny living things, like good bacteria and yeasts, to change vegetables. They eat the sugars in the veggies and make them taste tangy and a bit sour, while also making them last longer. It’s a natural way to preserve food and create yummy flavors.
Do I need special equipment to start fermenting?
Not really! For basic ferments, you mostly just need clean jars with lids, some salt, and the vegetables you want to ferment. We’ll show you how to get started without needing fancy gadgets. As you get more into it, you might want to try special fermentation weights or airlocks, but they aren’t necessary at the beginning.
What kinds of vegetables can we ferment?
Lots of them! We can ferment almost any crunchy vegetable. Think about things like cabbage for sauerkraut, cucumbers for pickles, carrots, radishes, and even garlic. The key is that they should be fresh and firm to start with. We’ll guide you on picking the best ones.
How do we know if our vegetables are fermenting correctly?
You’ll see some signs! Usually, you’ll notice bubbles forming in the jar, which means the good bacteria are busy doing their work. The liquid might get a little cloudy, and the smell will become pleasantly sour or tangy. If you see fuzzy green or black mold, that’s a sign something went wrong, and we’ll cover how to fix common problems.
Is it safe to eat fermented vegetables?
Yes, it’s very safe when done correctly! The process actually creates an environment where harmful bacteria can’t survive. The good bacteria we encourage actually protect the food. We’ll teach you the right way to use salt and keep things clean to ensure your ferments are healthy and delicious.
How long does fermentation take?
It really depends! Some ferments, like a quick pickle, can be ready in just a few days. Others, like a more traditional sauerkraut or kimchi, might take a few weeks to develop their full flavor. We’ll explain how to taste your ferments along the way to know when they’re just right for you.


