Zone 6 Winter Garden Prep: Mulching, Frost Protection, and Hoop Houses

As the days get shorter and the air gets colder here in Zone 6, it’s time to think about getting our gardens ready for winter. We want to make sure our plants and beds are protected from the frost and snow. This means doing some prep work now so we can enjoy a healthy garden next spring. We’ll cover mulching, protecting plants from frost, and even setting up hoop houses for a longer growing season.
Key Takeaways
- Preparing your garden beds now by adding amendments will help you get a head start in the spring.
- Protecting tender plants from frost can be done with row covers, bringing them inside, or using cold frames.
- Mulching your garden beds in the fall helps insulate the soil and protect plant roots from harsh winter weather.
- Hoop houses, especially mini ones, can extend your growing season and protect plants, but they need the right covering like white plastic to regulate temperature.
- When building hoop houses, consider using materials like concrete reinforcing mesh and weighting down the plastic securely to withstand wind.
Getting Your Garden Ready For Winter In Zone 6
As the leaves turn and the air gets that crisp bite, it’s time for us to get our Zone 6 gardens prepped for the colder months. We don’t want all our hard work to go to waste, right? So, let’s break down what we need to do to protect our plants and prepare our beds for the coming frost and snow.
Prepare Garden Beds For The Cold
Before the ground freezes solid, we should take some time to get our garden beds in order. This is the perfect moment to add any amendments our soil might need. Think compost, aged manure, or other organic matter. Mixing these in now means they’ll have time to break down over winter, enriching the soil for spring planting. We can also do a final clear-out of any spent annuals and weeds. Leaving diseased plant material can cause problems next year, so it’s best to remove it. For perennial beds, a light tidying up is usually enough. We want to give our plants a clean slate to start from when the weather warms up.
Protecting Tender Plants From Frost
Some of our favorite plants might not be as tough as others when it comes to cold. For those tender perennials or late-season crops that we want to keep going, we need a plan. A sudden frost can do a lot of damage overnight. We can use simple tools like row covers or freeze cloth to drape over them. These act like a light blanket, trapping a bit of warmth. For potted plants, bringing them into a garage, shed, or even the house for the coldest nights can make all the difference. If we have a particularly valuable or sensitive plant, we might consider a more robust solution like a cold frame or even a small hoop house to give it a fighting chance. It’s all about giving them that extra bit of protection when they need it most.
Storing Bulbs For The Winter
If we’ve grown tender bulbs like dahlias or gladiolus, they definitely won’t survive a Zone 6 winter in the ground. We need to dig them up after the first frost has killed the foliage, but before the ground freezes hard. Gently brush off the excess soil – don’t wash them! Let them dry out for a few days in a cool, airy spot. Then, we can store them in a few different ways. Packing them in peat moss, vermiculite, or even just newspaper in boxes or paper bags works well. The key is to keep them somewhere cool, dry, and dark, like a basement or an unheated garage, until spring rolls around again. We want to avoid any moisture, which can lead to rot.
Getting our garden ready for winter isn’t just about tidying up; it’s an investment in next year’s success. Taking these steps now saves us a lot of work and heartache when spring finally arrives. We’re setting ourselves up for a bountiful growing season by being proactive.
Mulching For Zone 6 Winter Garden Prep

As the temperatures start to drop here in Zone 6, we’re thinking about how to give our gardens the best chance to survive the cold and come back strong in the spring. One of the simplest, yet most effective, ways we prepare our beds is by adding a good layer of mulch. It might seem like a small thing, but trust us, it makes a big difference.
The Benefits Of Mulching In Winter
Mulching in the fall and early winter isn’t just about making things look tidy. It’s a practical step that helps our plants in several ways. First off, it acts like a cozy blanket for the soil. This helps keep the soil temperature more stable, preventing those damaging freeze-thaw cycles that can heave plants right out of the ground. It also helps retain moisture, which is important even when things are cold, and it suppresses weeds that might try to sneak in. Plus, as organic mulches break down over time, they add nutrients back into the soil, giving us a head start for next year’s planting.
Choosing The Right Mulch For Your Garden
We’ve found that not all mulches are created equal when it comes to winter prep. For our vegetable gardens and perennial beds, we often reach for things like shredded leaves, straw, or wood chips. Shredded leaves are fantastic because they’re usually free if you collect them in the fall, and they break down nicely. Straw is another good option, especially for covering vegetable beds after the last harvest. Wood chips are great for pathways and around shrubs, as they last a bit longer. For more delicate plants, we might use a finer mulch like compost.
Here’s a quick rundown of what we like to use:
- Shredded Leaves: Readily available, breaks down well, adds nutrients.
- Straw: Good for vegetable beds, insulates well, suppresses weeds.
- Wood Chips: Long-lasting, great for pathways and around woody plants.
- Compost: Adds nutrients and improves soil structure, good for finer mulching.
Applying Mulch For Maximum Protection
When we apply mulch for winter, we usually wait until the ground has started to cool down, but before it freezes solid. This is typically sometime in late fall. We aim for a layer that’s about 2 to 4 inches thick. It’s important not to pile mulch right up against the stems or trunks of plants, especially woody ones. Leaving a little space helps prevent rot and discourages pests from setting up shop. For newly planted perennials or anything we’re a bit worried about, we might add an extra-thick layer or even use a combination of materials, like straw over shredded leaves, for added insulation. The goal is to create a protective barrier that shields the soil and plant roots from harsh winter conditions.
We’ve learned that timing is key. Applying mulch too early can actually keep the soil warmer for longer, which might encourage late-season growth that’s vulnerable to frost. Waiting until the soil has cooled significantly means the mulch is there to protect dormant plants and soil, not to encourage activity.
We also make sure to clear away any dead plant material that might harbor diseases or pests before we lay down the mulch. It’s all about giving our garden the cleanest, coziest start to winter we can.
Frost Protection Strategies For Zone 6

When the temperatures start to dip in Zone 6, we need to think about protecting our precious plants from the cold. Frost can sneak up on us, and a sudden freeze can do a lot of damage if we’re not prepared. Luckily, there are a few straightforward ways we can shield our gardens from those chilly nights.
Understanding Frost And Its Impact
Frost happens when the surface temperature of plants drops to or below the freezing point of water (32°F or 0°C). This can happen even when the air temperature is a bit warmer, especially on clear, calm nights. When water inside plant cells freezes, it expands, damaging the cell walls. For tender plants, this can mean wilting, browning, and even death. We need to be aware of the forecast and know when a frost is likely to hit. Different plants have different tolerances, so knowing what you’re growing is key to knowing how much protection they’ll need. For instance, a hardy kale plant can handle a light frost, but a tomato plant will be toast.
Using Row Covers And Freeze Cloth
One of the simplest ways to guard against frost is by using row covers or freeze cloth. These are lightweight fabrics that we can drape directly over our plants or over a simple frame. They work by trapping a bit of heat radiating from the soil and creating a barrier against the cold air. You can buy these materials at most garden centers. For a bit of extra protection, especially on those really cold nights, you can even layer them or use them in conjunction with other methods. We’ve found that these covers can often add a few extra weeks to our growing season, letting us enjoy fresh veggies a little longer. You can find good guides on how to protect plants from frost online, which can be really helpful for timing and technique.
Cold Frames For Extended Growing Seasons
Cold frames are like mini-greenhouses that sit directly on the ground. They’re typically a bottomless box with a clear lid. We can use them to start seeds early in the spring or, importantly for us now, to keep plants growing later into the fall and even through mild winters. The glass or plastic lid lets sunlight in to warm the soil and plants inside, while the box structure shields them from wind and cold. They’re fantastic for growing hardier greens like spinach and lettuce well past the first frost. A cold frame is a great way to extend your harvest without a huge investment.
Here’s a quick look at how they help:
- Traps Heat: The lid and sides create a warmer microclimate inside.
- Protects from Elements: Shields plants from harsh winds, heavy rain, and light frost.
- Extends Season: Allows us to grow crops that might otherwise be finished by late fall.
We can even add a layer of row cover inside a cold frame on particularly frigid nights for an extra boost of warmth. It’s all about layering protection as the weather demands it.
Building Hoop Houses For Zone 6 Gardens
When we think about extending our growing season in Zone 6, especially into the colder months, hoop houses are a fantastic option. They’re not as complicated or expensive as a full greenhouse, but they offer a significant boost in protection for our plants. We can use them to keep tender crops going longer or even start seeds earlier in the spring. They create a microclimate that’s warmer and more protected than the open garden.
What Is A Hoop House?
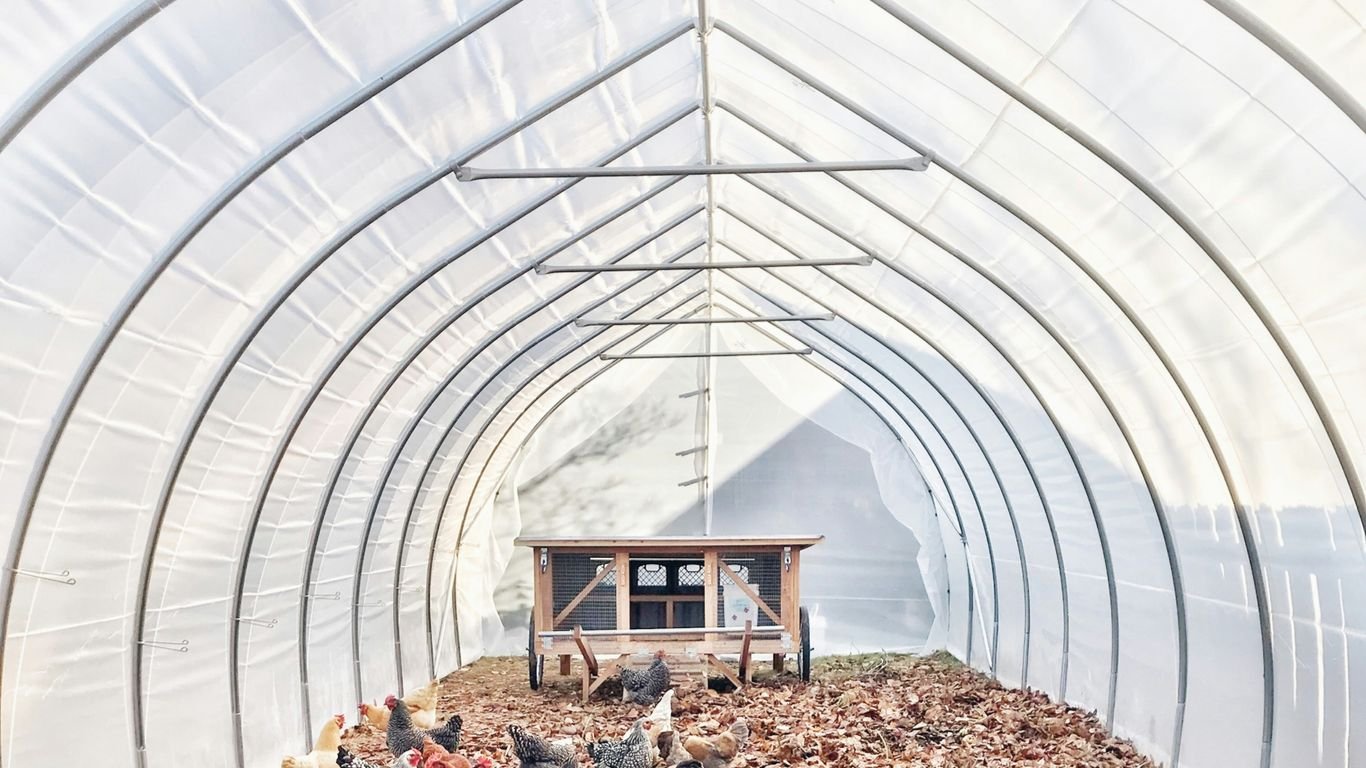
A hoop house, in its simplest form, is a structure made of hoops covered with a protective material, usually plastic. For our Zone 6 gardens, we’re often talking about smaller, more manageable versions, sometimes called mini hoop houses. These are typically low to the ground, just a few feet high, designed to cover garden beds. They work by trapping solar heat and protecting plants from harsh winds and frost. The real magic is how they create a warmer, more stable environment for our veggies.
Materials For Building Hoop Houses
We can get pretty creative with materials, but some common choices work best. For the hoops themselves, we’ve found that concrete reinforcing mesh is a great, sturdy option. It’s strong enough to hold its shape and can be cut into sections to create arches. We usually cut it into about 7-foot lengths for a standard garden bed width. Another popular choice is electrical conduit, especially for larger structures where you might want more headroom. For the covering, greenhouse-grade plastic is ideal, but even heavy-duty polyethylene sheeting can work. We’ll need something to secure the plastic, like sandbags or soil, to keep it from blowing away.
Here’s a quick look at some material ideas:
- Hoops: Concrete reinforcing mesh, electrical conduit, PVC pipes (though these can become brittle in the cold).
- Covering: Greenhouse-grade polyethylene film, heavy-duty clear or white plastic sheeting.
- Fasteners/Anchors: Sandbags, soil, heavy rocks (use with caution to avoid damaging plastic), rebar stakes.
- Tools: Bolt cutters (for mesh), pipe benders (for conduit), staple gun or wood strips (for securing plastic to a frame).
Setting Up Your Hoop House For Winter
Getting your hoop house ready for winter involves a few key steps. First, we need to construct the basic frame. If we’re using concrete mesh, we cut it to size and bend it into arches, pressing the ends into the ground to anchor them. We space these hoops a few feet apart. Then, we drape our plastic sheeting over the hoops, making sure it’s wide enough to reach the ground on both sides. It’s important to pull the plastic taut to prevent wind damage. We then secure the edges firmly with sandbags or soil all the way around. If we’re using clear plastic, we’ll need to paint it with white latex paint to reflect excess sunlight and prevent overheating, even in winter. Finally, a little insurance: if the weather allows, we can lightly water the soil inside before sealing it up. This moisture can help buffer temperature fluctuations.
When setting up, think about how you’ll access your plants. For mini hoop houses, sometimes hinging one side of the plastic or using a frame that allows you to lift a section can make watering and harvesting much easier throughout the winter months. We want to make it functional, not just protective.
Here are the basic steps we follow:
- Install the Hoops: Bend your chosen material into arches and secure them firmly into the ground, spacing them appropriately for stability.
- Drape the Covering: Carefully unroll your plastic sheeting over the hoops, ensuring it extends to the ground on all sides.
- Secure the Edges: Use sand, soil, or other heavy anchors to weigh down the plastic along the entire perimeter. Make sure it’s tight!
- Paint (if needed): If using clear plastic, apply a coat of white latex paint to the exterior.
- Add Extra Layers (Optional): For colder areas, consider adding a layer of frost cloth inside the hoop house for even more protection.
Maintaining Your Hoop House Through Winter

So, we’ve got our hoop house all set up and ready to go for the colder months. Now, what do we do to keep it in good shape and our plants happy? It’s not as complicated as you might think, but there are a few key things to keep an eye on.
Watering Your Plants in a Hoop House
This is a big one, and it’s a bit different from watering during the growing season. For smaller hoop houses, especially the low-profile ones, you usually don’t need to water much, if at all, once winter really sets in. The key is to make sure your plants are well-watered right before you cover them up for the season. If you’ve done that, and especially if you have snow cover, they’ll likely have enough moisture. Snow is actually great because it insulates and provides moisture as it melts. If you can, giving them a good soak before the deep freeze is your best bet. For larger hoop houses, watering might be needed every few weeks, but this often means winterizing and then re-connecting irrigation lines, which is a lot of work. For most of us with home gardens, a good initial watering is usually sufficient.
Dealing With Snow Loads on Hoop Houses
Snow can be both a friend and a foe to your hoop house. While it provides insulation, a heavy accumulation can put a lot of stress on the structure. If you have a sturdy hoop house, it should handle a decent amount of snow. However, if you’re expecting a really heavy snowfall, it’s a good idea to go out and gently brush or sweep some of the snow off the plastic. Be careful not to damage the covering. For very large hoop houses, this can be a significant task, sometimes requiring a crew. For smaller, home-garden-sized structures, a little attention can go a long way in preventing damage. Remember, the angle of your hoop house roof helps snow slide off, but sometimes it just piles up too much.
Ventilation Needs for Hoop Houses
This might seem counterintuitive in winter, but ventilation is still important, especially on warmer, sunny days. Even in winter, the sun can heat up the inside of a hoop house. If it gets too warm, it can trick your plants into thinking it’s spring and disrupt their dormancy. For larger hoop houses, this means opening doors or vents for a period to let out the excess heat and moisture. For smaller hoop houses, you might just need to crack a door or lift an edge of the plastic for a short time on those unusually warm days. It’s all about managing that temperature and humidity balance. We want to keep things cold but not necessarily frozen solid all the time, and avoid excessive condensation. Preparing your greenhouse for winter involves more than just covering it up; it’s about active management. cleaning its cover
The goal in winter is to keep the inside of the hoop house cold, mimicking the natural dormant period plants need. We’re not trying to grow new things, just protect what’s already there. This means avoiding unnecessary warmth and moisture buildup.
Choosing The Right Covering For Hoop Houses

When we’re setting up our hoop houses for the winter, the covering is a pretty big deal. It’s what keeps the cold out and the warmth in, and there are a couple of main options we usually think about. It really comes down to what we’re trying to grow and how much we want to spend.
White Plastic Vs. Clear Plastic
So, we’ve got clear plastic and white plastic. Clear plastic lets in a lot of light, which sounds great, right? But here’s the thing: in the winter, that sunlight can still heat things up a bit too much during the day, and then when the sun goes down, it cools off really fast. Plus, clear plastic can sometimes get a bit too much sun exposure and degrade faster. White plastic, on the other hand, is designed to diffuse light more evenly and can offer better insulation. It’s often a bit thicker and more durable for winter conditions.
Painting Clear Plastic For Winter Use
If we happen to have clear plastic already and want to use it for winter, we can actually paint it. We’ll use a white latex paint, and just slosh it on. This helps to diffuse the light and can make it act more like white plastic. It’s not quite the same as buying dedicated white plastic, but it’s a good way to repurpose what we have. We need to make sure we get good coverage, though, so the sun’s rays bounce off effectively.
Where To Find White Plastic For Hoop Houses
Finding the right kind of white plastic is key. We usually check with nursery supply houses or places that sell greenhouse materials. They’ll often have rolls of polyethylene specifically made for this purpose. It’s worth looking for something that’s rated for UV resistance and is a decent thickness, usually around 6 mil, to hold up to winter weather. We want to make sure it’s taut when we put it on, so we use sand or soil along the edges to hold it down firmly against the wind. Bricks or lumber just don’t cut it; the wind will get under them and tear the plastic.
Wrapping Up Our Winter Garden Prep
So there you have it! We’ve covered how to get our gardens ready for the cold months ahead. Mulching is key for keeping those roots cozy, and knowing how to protect plants from sudden frosts can save a lot of heartache. And those hoop houses? They’re a game-changer for extending our growing season, even here in Zone 6. It might seem like a lot, but taking these steps now means we’ll be that much closer to enjoying fresh veggies earlier next spring. Happy gardening, everyone!
Frequently Asked Questions
Why should we cover our garden beds with mulch in the winter?
Mulching is like giving our garden beds a cozy blanket for the winter. It helps keep the soil temperature more steady, meaning it won’t freeze and thaw as much. This protects plant roots and also helps keep moisture in the soil, which is great for the plants that stay outside.
What kind of stuff can we use as mulch?
We have lots of choices! Things like straw, shredded leaves, wood chips, or even compost work well. The best kind depends on what we want to protect and what’s available. We just want to make sure it’s something that breaks down over time and helps the soil.
How do we put mulch down to protect our plants best?
We should spread a good layer of mulch around our plants, but not right up against their stems. A few inches thick is usually good. This helps keep the cold out and the moisture in, giving our plants a better chance to survive the winter.
What exactly is frost and why is it bad for our plants?
Frost is like a thin layer of ice that forms on plants when the temperature drops below freezing. It can really damage or even kill tender plants because the water inside their cells freezes and expands, bursting them. We need to be ready to protect them when a frost is expected.
What are hoop houses and how do they help in winter?
Hoop houses are like mini greenhouses made by bending pipes into arches over garden beds and covering them with plastic. They create a protected space that’s warmer than the outside air. This allows us to grow or protect certain plants even when it’s cold, and it can even extend our harvest season.
Do we need to water plants inside a hoop house during winter?
Generally, no. If we make sure the plants are well-watered before we cover them, and if there’s snow, that provides moisture too. Low hoop houses have less empty space, so they hold moisture well. It’s usually fine unless it gets very dry, and even then, watering might not always be possible if things are frozen.


