High-Yield Canning Recipes for Big Harvests
We all love a garden that gives us more than we can eat right away, don’t we? When that happens, we want to make sure we don’t let any of that good food go to waste. That’s where canning comes in. We’ve put together some fantastic high yield canning recipes that will help you fill your pantry with delicious, preserved food from your biggest harvests. It’s a great way to save money and have healthy food ready anytime.
Key Takeaways
- Understanding the difference between water bath canning and pressure canning is key to safely preserving your food.
- Always follow tested recipes and safety guidelines to avoid spoilage and ensure your canned goods are safe to eat.
- Pressure canning is necessary for low-acid foods like most vegetables to kill harmful bacteria.
- Water bath canning works well for high-acid foods like fruits, jams, and pickles.
- Canning is a rewarding way to preserve your harvest, reduce waste, and enjoy your homegrown food year-round.
Mastering High-Yield Canning Recipes
Getting started with canning can feel a bit overwhelming, especially when you’ve got a huge harvest staring you down. We’ve all been there, staring at overflowing garden baskets and wondering how to make all that goodness last. The good news is, with the right approach, canning is totally doable and incredibly rewarding. It’s a fantastic way to save money, reduce waste, and have delicious, homemade food ready to go whenever you need it.
Understanding Water Bath vs. Pressure Canning
This is probably the most important thing to get straight before you even open a jar. Not all foods are created equal when it comes to canning safety. We need to think about acidity. Foods with a pH of 4.6 or lower are considered acidic and are generally safe for water bath canning. Think fruits, jams, jellies, pickles, and most tomato products (though tomatoes often need a little help with added acid, like lemon juice or citric acid, to be safe).
On the other hand, low-acid foods, like most vegetables, meats, and broths, need a different approach. These foods can potentially harbor Clostridium botulinum spores, which can cause botulism. To kill these spores, we need higher temperatures than a boiling water bath can provide. That’s where the pressure canner comes in. It reaches temperatures well above boiling, making it safe for these lower-acid items.
Here’s a quick rundown:
- Water Bath Canning: Best for high-acid foods (fruits, pickles, jams, jellies, acidified tomatoes).
- Pressure Canning: Required for low-acid foods (most vegetables, meats, poultry, fish, broths).
Always follow tested recipes from reliable sources. They’ve done the science so you don’t have to guess. Trying to
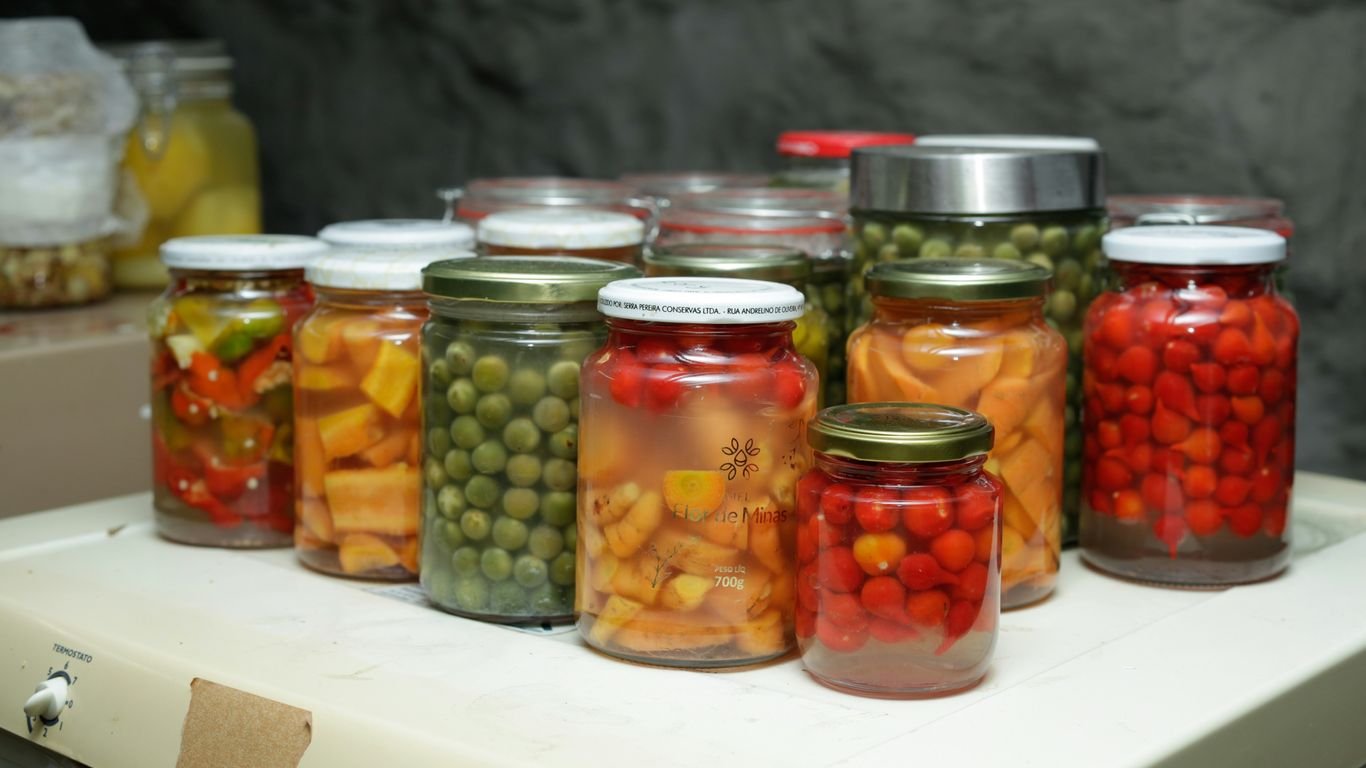
Preserving Your Bountiful Vegetable Harvest
When our gardens overflow, we want to make sure none of that goodness goes to waste. Canning is our go-to method for preserving the season’s best vegetables. It’s a fantastic way to enjoy the taste of summer long after the last frost. We find that canning vegetables not only saves money but also gives us peace of mind knowing we have healthy options readily available.
Sweet Corn Canning Delights
Fresh corn is a summer highlight, and canning it lets us capture that sweet, just-picked flavor. We usually wait until the corn is perfectly tender, then we blanch and pack it into jars. It’s important to remember that corn is a low-acid food, so we always use a pressure canner for plain corn. This ensures it’s safe and shelf-stable. We love having canned corn for quick weeknight meals, whether it’s mixed into a casserole or served as a simple side dish.
Green Bean Canning Perfection
Green beans are one of the easiest vegetables to grow and preserve. When we have a huge haul, canning is the perfect solution. Like corn, green beans are low-acid, meaning they require a pressure canner for safe preservation. However, if you prefer using a water bath canner, pickling them is a great alternative! Dilly beans, with their tangy, garlicky flavor, are a family favorite and process beautifully in a water bath. We find that having jars of both plain and pickled green beans gives us great variety throughout the year.
Carrot Canning Creations
Carrots are wonderfully versatile, both fresh from the garden and canned. While they can be stored for a while in a cool root cellar, canning extends their life even further. Carrots, being low-acid, are safe to can using a pressure canner. We often can them whole or sliced to add to soups and stews during the colder months. Pickled carrots are another treat; their natural sweetness pairs wonderfully with vinegar and spices, making for a crisp and flavorful condiment. It’s amazing how a simple carrot can be transformed into so many delicious preserved goods.
Lima Bean Canning Success
Lima beans, with their creamy texture and rich flavor, are a welcome addition to our pantry. Canning them is a straightforward process, but like most vegetables, they require a pressure canner to ensure safety due to their low-acid content. We usually blanch them briefly before packing them into jars. Having canned lima beans means we can easily add them to hearty soups, stews, or even make a quick succotash. It’s a simple step that brings a lot of convenience to our meal planning, especially when we want a taste of home-style cooking without the long preparation time. Canning these legumes is a great way to preserve your harvest.
Canning vegetables might seem daunting at first, but with the right equipment and a little practice, it becomes a rewarding part of our food preservation routine. Always follow tested recipes to guarantee safety and quality.
Fruity Canning Recipes for Sweet Preservation

When our fruit trees and bushes are overflowing, we love to capture that summer sweetness to enjoy all year long. Canning fruits is a fantastic way to preserve their natural flavors, and it’s surprisingly straightforward. We find that water bath canning is perfect for most fruits because they are naturally acidic, making them safe for this method. Preserving fruits lets us enjoy the taste of sunshine even in the dead of winter.
We’ve found that apples and apricots are particularly rewarding to can. Apples can be turned into delicious pie fillings, jams, or simply preserved as slices. Apricots, with their vibrant flavor, make wonderful jams, butters, and even pie fillings. Don’t forget about berries! While some, like elderberries, require careful attention to acidity levels, most berries can be transformed into delightful jams and jellies. Even citrus fruits like oranges can be canned, offering a bright, tangy addition to our pantry.
Here are some of our favorite fruit canning projects:
- Apple Canning Classics: Think apple pie filling ready to go, spiced apple slices, or even apple butter. We love using a mix of sweet and tart apples for the best flavor.
- Apricot Canning Adventures: From simple apricot jam to a more complex apricot butter, these preserve the unique taste of this stone fruit beautifully.
- Berry Canning Bonanza: Whether it’s strawberries, raspberries, or blueberries, canning berries is a must. We often make mixed berry jams for a taste of everything.
- Grape Canning Goodness: Grape juice is a classic, but we also enjoy making grape jelly or canning whole grapes for a simple treat.
When canning fruits, always follow tested recipes from reliable sources. While many fruits are acidic, it’s important to know the specific requirements for each type to ensure safety. Adjusting sugar levels is often possible, but never compromise on the recommended processing times or acidity adjustments.
We also like to experiment with fruit combinations. Canning a mix of fruits can create unique flavor profiles. For instance, a peach-raspberry jam or an apple-cranberry conserve can be a delightful surprise. Remember, the goal is to capture the essence of the fruit at its peak, so choosing ripe, high-quality produce is key to the best results.
Tangy and Savory Canning Creations
Pickle Canning Pleasures
When we think about canning, pickles often come to mind first. They’re a classic for a reason! We love turning a big batch of cucumbers into crisp, tangy pickles that last through the winter. But don’t stop at cucumbers! We can also pickle green beans for a zesty side, or even try something a little different like pickled grapes. The key is a good brine – usually a mix of vinegar, water, salt, and spices. For a quick pickle, you can have them ready in a few days, but for shelf-stable canning, we follow tested recipes to make sure they’re safe and delicious for months.
Here’s a basic idea of what goes into a pickle brine:
- Vinegar: Usually white or apple cider vinegar (5% acidity).
- Water: To dilute the vinegar.
- Salt: Pickling salt is best to avoid cloudiness.
- Sugar: For a touch of sweetness, especially in bread-and-butter style pickles.
- Spices: Dill, garlic, peppercorns, mustard seeds, and bay leaves are common.
Salsa Canning Sensations
Tomatoes are great, but what about turning them into a vibrant salsa? Canning salsa is a fantastic way to preserve the taste of summer. We like to add peppers, onions, and cilantro for that fresh salsa flavor. It’s important to use a tested recipe for salsa, as the acidity needs to be just right to ensure safe canning, especially when using tomatoes that might not be super acidic on their own. We often add a bit of lemon juice or citric acid to boost the acidity if the recipe calls for it.
Tomato Canning Versatility
Beyond salsa, tomatoes are incredibly versatile in the canning world. We can them whole, diced, or as crushed tomatoes. This is a great way to have a base for soups, sauces, and stews all year long. If we have a huge haul of tomatoes, we might even make tomato paste or a rich tomato sauce. Remember, for plain tomatoes, adding a bit of lemon juice or citric acid to each jar is recommended to maintain a safe pH level for water bath canning.
Relish Canning Recipes
Relishes are another wonderful way to use up a surplus of vegetables. Think about a sweet pickle relish for hot dogs, or a corn relish packed with peppers and onions. We’ve even seen recipes for rhubarb-cherry chutney that are amazing with pork or cream cheese. These often involve chopping up a mix of veggies, cooking them down with vinegar, sugar, and spices, and then canning them. They add a burst of flavor to so many dishes.
Canning relishes and chutneys can seem a bit more involved than simple pickles, but the payoff is huge. You get complex, layered flavors that are perfect for jazzing up meals or serving at gatherings. Just be sure to follow your recipe closely, especially regarding cooking times and ingredient ratios, to get that perfect tangy and savory balance.
Beyond the Basics: Advanced Canning Techniques
Canning Meats and Broths
So, we’ve covered fruits and veggies, but what about the heartier stuff? Canning meats and broths is totally doable, and it’s a game-changer for quick weeknight meals. Think homemade chicken broth ready to go for soup, or beef stew components you can just heat and eat. The key here is pressure canning. Because meat and broth are low-acid, they absolutely need the higher temperatures that only a pressure canner can provide to be safe. Water bath canning just won’t cut it and can be dangerous.
Here’s a quick rundown of what you’ll need and some general steps:
- A Reliable Pressure Canner: Make sure it’s a dedicated pressure canner, not a pressure cooker. They look different and operate differently.
- Tested Recipes: Always, always use tested recipes specifically for canning meat or broth. These recipes have the right timings and pressure levels figured out.
- Proper Preparation: Meats should be fresh, and you’ll often want to cook them slightly or remove bones before canning.
- Achieving Correct Pressure: You’ll need to maintain a specific pressure (usually 10-15 PSI, depending on your altitude and canner model) for the entire processing time.
Don’t guess when it comes to canning meats; safety is paramount.
Pressure Canning for Low-Acid Foods
We touched on this with meats, but it applies to other low-acid foods too, like most vegetables (think plain corn, beans, or potatoes without added acid). These foods have a pH above 4.6, which is the danger zone for Clostridium botulinum spores. These spores can survive boiling water temperatures and produce a deadly toxin. Pressure canning reaches temperatures well above boiling (240°F or higher), which effectively destroys these spores.
It might seem a bit intimidating at first, but once you get the hang of it, it’s quite straightforward. The main things to focus on are:
- Using your canner correctly: Understand how to vent it, reach and maintain the correct pressure, and cool it down safely.
- Following tested recipes precisely: Processing times and pressure are non-negotiable for safety.
- Checking your equipment: Ensure your canner’s gauge is accurate (get it tested annually if possible).
Remember, the goal of pressure canning low-acid foods is to kill any potential botulism spores. This isn’t something to take lightly, and using reliable, up-to-date recipes is your best defense.
Creative Jam and Jelly Recipes
While we’ve mostly talked about preserving whole foods, let’s not forget the sweet stuff! Making your own jams and jellies is incredibly rewarding, and you can get really creative. Forget those recipes that call for a pound of sugar for every pound of fruit; we can make delicious, lower-sugar versions that let the fruit’s natural flavor shine.
- Low-Sugar Jams: These often use a bit of pectin (like Pomona’s Pectin, which is calcium-based and works differently than regular pectin) or rely on the natural pectin in fruits like apples or citrus.
- Fruit Combinations: Mix and match! Think strawberry-rhubarb, apple-cranberry, or peach-ginger.
- Flavor Boosts: Add a splash of vanilla, a bit of cinnamon, or even a hint of chili for a kick.
Making jam and jelly is a fantastic way to use up fruit that might be a little too soft for canning whole. Just remember, because fruits are high-acid, these are typically safe for water bath canning. Always use a tested recipe, especially if you’re reducing sugar or using alternative pectins.
Happy Canning!
So there you have it! We’ve walked through some fantastic ways to turn that overflowing garden into jars of deliciousness that will last. Whether you’re just starting out with water bath canning or ready to tackle pressure canning for those low-acid veggies, we hope these ideas give you a great head start. Don’t let that harvest go to waste – get those jars filled and enjoy the fruits (and veggies!) of your labor all year long. Happy canning, everyone!
Frequently Asked Questions
What’s the main difference between water bath canning and pressure canning?
Think of it like this: water bath canning is like giving your jars a hot bath, boiling them in water. This works great for super acidic foods like fruits and pickles. Pressure canning, on the other hand, is like giving them a high-pressure steam treatment, reaching much hotter temperatures. This is super important for less acidic foods, like most vegetables and meats, because it kills off tougher germs that can’t survive in a regular boiling water bath.
Why do some vegetables need pressure canning, but others don’t?
It all comes down to acidity! Foods with a low pH, meaning they’re more acidic, can be safely canned using a water bath. Most vegetables, however, are low in acid. To make them safe for canning, we need the higher heat from a pressure canner to get rid of any nasty bacteria, like botulism spores, that can grow in these less acidic environments.
Can I can tomatoes using a water bath canner?
Yes, you can! But here’s the catch: tomatoes are only slightly acidic, and sometimes not enough for safe water bath canning, especially if you add other veggies to them. To be absolutely sure, we always add a little something extra, like a bit of bottled lemon juice or citric acid, to boost their acidity. This way, we know they’re safe to store on the shelf.
What kind of equipment do I absolutely need for canning?
For starters, you’ll need jars, lids, and rings, of course! Then, depending on what you’re canning, you’ll need either a large pot with a rack for water bath canning or a special pressure canner. Don’t confuse a pressure canner with a regular pressure cooker; they’re different tools designed for different jobs.
How do I know if a canning recipe is safe to use?
The golden rule is to always stick to tested recipes from reliable sources. We’re talking about guidelines from places like the National Center for Home Food Preservation or reputable canning books. These recipes have been carefully checked to make sure they use the right ingredients and methods to keep your food safe and delicious.
What are some beginner-friendly canning recipes?
We always suggest starting with high-acid foods. Think simple fruit jams, jellies, or pickles. Water bath canning is generally easier to learn, and these recipes are a fantastic way to get comfortable with the process before moving on to more complex pressure canning projects.