How to Build a Rainwater Collection System in a Weekend
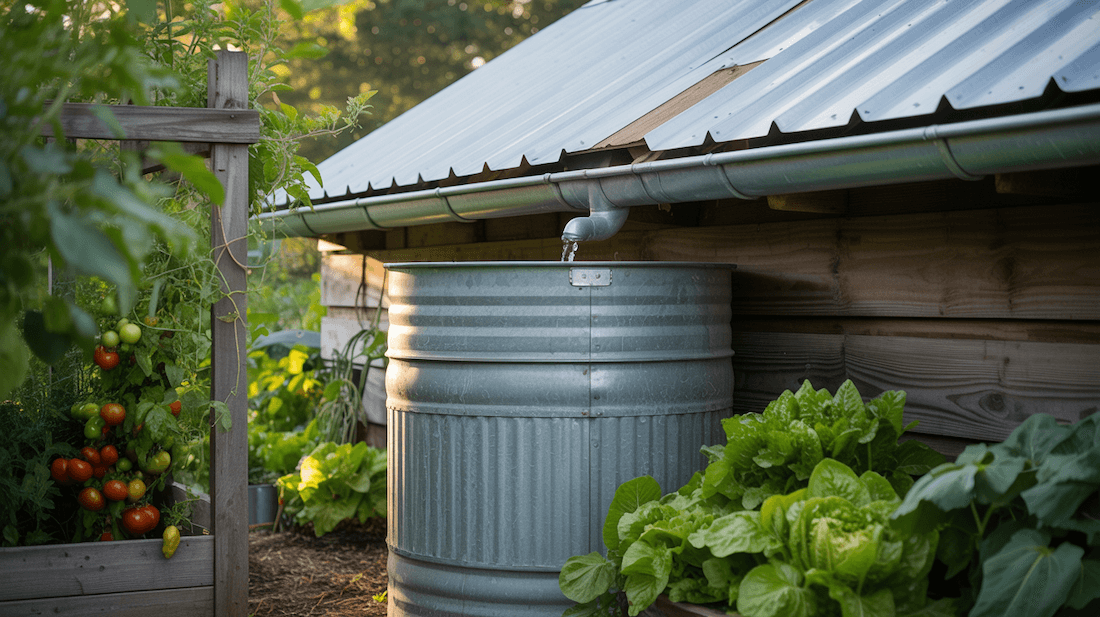
This weekend, we decided to tackle a project that felt a bit daunting at first: building our own rainwater collection system. We’d seen others do it and thought, why not give it a shot? It turns out, with a little planning and the right parts, it’s totally doable for a weekend warrior like us. We wanted to share what we learned, from figuring out how much water we could actually catch to making sure our collected water was clean and ready to use. Get ready to turn those rainy days into a resource instead of just a reason to stay inside!
Key Takeaways
- Before you start, figure out how much water your roof can catch and where you’ll collect it from. This planning step is super important for your rainwater collection system.
- You’ll need a storage tank and some basic parts to connect your gutters and downspouts. Think about whether you want to spend a bit more for higher quality parts or save money with budget options.
- Make sure your storage tank has a strong base. Filled barrels are heavy, so a solid platform is a must for your rainwater collection system.
- Adjust your gutters and downspouts so water flows well. Adding diverters helps send the water right where you want it.
- Use filters and a first flush diverter to keep your collected water clean and free of leaves and debris.
Planning Your Rainwater Collection System

Before we start getting our hands dirty with tools and pipes, we need to do a little bit of thinking. This part is all about figuring out what we need and what we can realistically collect. It’s like drawing up a blueprint before building a house, but for water! A little planning now saves a lot of headaches later, and trust me, we want to collect as much water as possible.
Our roofs are basically giant funnels waiting for rain. To figure out how much water we can actually catch, we need to do some simple math. It’s not as scary as it sounds, and knowing this number helps us pick the right size tank.
Here’s the basic idea: the size of your roof and how much rain falls in your area are the two main things. We can use a simple formula to get a good estimate. Think of your roof area in square feet. Then, you’ll need to know the average rainfall in inches for your area. Multiply those two numbers, and then multiply that by 0.623. That number, 0.623, is just a conversion factor that turns inches of rain on a square foot into gallons of water.
So, the formula looks like this:
Roof Area (sq. ft) × Rainfall (inches) × 0.623 = Potential Gallons Collected
For example, if you have a roof that’s 1,000 square feet and your town gets about 40 inches of rain per year, you could potentially collect around 24,920 gallons of water annually! That’s a lot of water for your garden or washing the car.
Now that we know how much water we might get, we need to think about where on our roof we’ll actually collect it. This usually means looking at our gutters and downspouts. We want to pick the downspouts that are easiest to access and that don’t have too many leaves or other junk falling into them.
- Downspout Location: Try to pick downspouts that are close to where you plan to put your rain barrel or tank. Water doesn’t like to travel uphill, and shorter distances mean less chance of leaks or problems.
- Tree Proximity: If a downspout is right under a big tree, it’s probably going to get clogged with leaves and twigs. We might want to avoid those or plan for extra filtering.
- Accessibility: Think about where you’ll put your barrel. You’ll need to be able to get to it to connect hoses or just to check on it.
We want to make sure our collection points are easy to get to and don’t require a lot of extra work to keep clear. It’s better to have a slightly less ideal spot that’s easy to maintain than a perfect spot that’s always getting clogged.
This is a super important step that a lot of people skip, but we really shouldn’t. Depending on where we live, there might be rules about collecting rainwater. Some places are totally fine with it, others might have specific requirements, like needing a permit or having limits on how much you can collect.
- Check with your city or county government. Their website or planning department is usually the best place to start.
- Look for any rules about where you can place your tank or how large it can be.
- See if there are any restrictions on how you can use the collected water.
It’s always better to be safe than sorry. Taking a few minutes to check the local rules will save us from potential trouble down the road. Most places are pretty encouraging of rainwater harvesting, but it’s good to know the specifics for our area.
Gathering Your Rainwater Harvesting Components

Alright, now that we’ve got our plan sorted, it’s time to talk about the actual stuff we need to build this thing. Think of this as your shopping list for becoming a water-saving pro. We’re going to break down the key pieces you’ll need to get your system up and running.
Selecting The Right Storage Tank
This is where all that lovely rainwater will end up. The size and type of tank you choose really depend on how much water you think you’ll collect and what you plan to do with it. For a basic setup, a 55-gallon rain barrel is a fantastic starting point. They’re pretty easy to find and manage. If you’re aiming for something bigger, you might look into larger plastic tanks or even underground cisterns, but for a weekend project, a barrel is usually the way to go. When you’re shopping, don’t just grab any old container; make sure it’s food-grade if you’re thinking about using the water for anything beyond watering plants, and check that it has a secure lid and an inlet screen to keep out leaves and bugs.
Essential Downspout And Gutter Modifications
Your existing gutters and downspouts are going to be the main highways for the water. You’ll likely need a downspout diverter, which is a neat little gadget that redirects water from your downspout into your barrel. Some systems use a flexible hose, while others have a more permanent fitting. You might also want to add some gutter mesh or screens. These are like little hats for your gutters, stopping leaves and debris from clogging everything up. It’s a small step, but it makes a big difference in keeping your system clean.
Choosing Budget-Friendly Or Premium Parts
Just like anything else, you can go all out or keep it simple. For the budget-conscious, you can often find used food-grade barrels or kits that include the basics. You might need to do a little more DIY on these, like adding your own spigot. On the premium side, you can get tanks with built-in overflow systems, water level gauges, and fancier spigots. We found that a good middle ground offers the best value for a weekend build. You want parts that will last but don’t break the bank. For a solid start, consider looking at a complete rainwater kit that bundles many of these components together.
Setting Up Your Rain Barrel Foundation
Alright, we’ve got our components, and now it’s time to give our rain barrel a proper home. Think of this as building a sturdy base for your water-saving superhero. A full rain barrel can get pretty heavy – we’re talking hundreds of pounds, depending on the size – so we absolutely need a solid foundation. We don’t want our hard work ending up in a puddle!
Creating A Rock-Solid Platform For Your Tank
First things first, we need to level the ground where the barrel will sit. A wobbly barrel is a recipe for disaster. We can use concrete pavers, cinder blocks, or even some sturdy, treated lumber to create a stable platform. The goal is a flat, firm surface that can handle the weight. We want to make sure it’s perfectly level, so grab your spirit level for this.
- Clear the area of any debris.
- Lay down your chosen foundation material (pavers, blocks, etc.).
- Use a level to check that the surface is completely flat.
- Add or remove material as needed to achieve a level surface.
Ensuring Your Barrel Has A Sturdy Stand
Now, let’s get that barrel off the ground a bit. Elevating the barrel serves a couple of purposes. It makes it easier to place a watering can or bucket underneath the spigot, and it also helps with overflow management. You can buy pre-made stands, or if you’re feeling handy, you can build one yourself using pressure-treated lumber. We want something that’s strong and won’t rot away quickly. A simple design using 4×4 posts for the legs and 2x6s for the top platform usually does the trick. Just make sure the stand is wide enough to support the base of your barrel securely.
Remember, the weight of the water is significant. Don’t skimp on the foundation or the stand. A little extra effort here prevents a lot of potential problems later on.
Directing Water Flow With Gutters And Downspouts
Now that we’ve got our collection points figured out, it’s time to make sure the water actually gets where we want it to go. This means we need to become conductors for our home’s water symphony, guiding every drop from the roof to our barrels.
Achieving The Perfect Gutter Tilt
Gutters aren’t just decorative; they’re designed to funnel water. To do this effectively, they need a slight tilt. We want a gentle slope, not a steep drop, so the water flows smoothly without pooling. A good rule of thumb is a drop of about a quarter-inch for every 10 feet of horizontal gutter. This ensures that even when it’s not raining heavily, any residual water will make its way to the downspout. Too flat, and you risk stagnant water and debris buildup; too steep, and the water might rush past your collection points too quickly.
Modifying Downspouts For Optimal Collection
Your downspouts are the main highways for rainwater. We might need to make a few adjustments here. If your existing downspout doesn’t line up with your chosen collection point, you’ll need to modify it. This usually involves cutting the downspout and adding an elbow or a flexible extension to direct the flow. When cutting, measure twice and cut once! A hacksaw works well for this. Remember to keep the water flow as smooth as possible; sharp turns can slow things down or cause blockages. If you have tight corners, consider using sweeping bends instead of sharp 90-degree angles for better flow.
Installing Water-Redirecting Diverters
This is where the magic happens. A downspout diverter is a clever device that allows you to send water either into your rain barrel or back down the original downspout. Many diverters are designed as a ‘Y’ connection. You can choose to divert water to your barrel during the rainy season and then switch it back to the ground during dry spells or when you need to empty your tank. When selecting a diverter, make sure it matches the size of your downspout (common sizes are 2×3 inch or 3×4 inch) and consider the color to match your home. This simple addition gives us control over where the water goes, making our system adaptable. We can find these diverters at most hardware stores, or even online at places like rain barrel parts.
We need to be mindful of where the water is going after it leaves the downspout. If we’re directing it to a garden bed, we want to make sure it’s not causing erosion or flooding that area. Planning the final destination of the water is just as important as collecting it.
Protecting Your Harvested Water

Now that we’ve got our system set up, we need to make sure the water we’re collecting stays clean and usable. Think of debris like uninvited party crashers – they’ll cause trouble if you let them hang around. We want to keep our collected water as pure as possible, and there are a few key ways we can do that.
Using First Flush Diverters to Skip the Grimy Start
The very first bit of rain that hits your roof washes off a lot of accumulated gunk – dust, pollen, bird droppings, you name it. A first flush diverter is a simple device that lets this initial, dirtier water flow away before it enters your main storage tank. It’s like giving your system a quick rinse before the good stuff comes through. We can set these up to automatically close off after a certain amount of water has passed, sending the cleaner rain into the barrel. This is probably the single most important step for keeping your water quality high.
Installing Leaf Guards and Tank Screens
We’ll want to put screens on our downspouts and at the inlet of the tank itself. Leaf guards for your gutters are a great idea too, as they stop larger debris from even getting into the downspout system. Inside the tank, an inlet screen acts as a final barrier against leaves, twigs, and other bits that might have made it this far. It’s a good idea to check and clean these screens periodically, especially after heavy rain.
Adding Filters for Cleaner Water
Depending on what you plan to use the water for, you might want to add extra filtration. For general garden use, the screens might be enough. But if you’re thinking about using it for anything that might involve contact with people or pets, or even for watering edibles, a finer filter can make a big difference. You can get simple mesh filters that attach to your spigot, or more involved inline filter systems. It’s all about matching the filtration level to your intended use. We found that a simple sediment filter works wonders for our garden needs, keeping the water clear and free of any small particles that might have slipped through the initial screens. This is a great way to get more out of your rainwater harvesting system for your garden.
Keeping your collected water clean from the start means less work down the line and better quality water for whatever you need it for. It’s a small effort that pays off big time.
Making Your Rainwater Collection System Work
Alright, we’ve got our components, we’ve got our foundation, and the water is ready to flow. Now, let’s get this system actually collecting and ready for use. It’s not super complicated, but a few key steps make all the difference.
Connecting Your System for Water Capture
This is where everything comes together. We need to make sure the water from your gutters and downspouts actually makes it into your storage tank. If you’ve modified your downspouts, you’ll connect them to the inlet of your rain barrel or tank. Often, this involves a flexible hose or a direct pipe connection. Make sure these connections are snug to prevent leaks. We also want to think about what happens if the tank fills up. Installing an overflow pipe is a good idea. This pipe should direct excess water away from your foundation, maybe to another part of your garden or a drainage area. It’s like a safety valve for your water supply.
Setting Up a Spigot or Pump for Access
So, you’ve got water stored – awesome! But how do you get it out? For most rain barrels, a simple spigot at the bottom is all you need. This is great for filling watering cans or connecting a short hose. If you’re planning to use the water for more than just garden watering, like washing a car or even for indoor use (after proper filtration, of course), you might need a pump. Pumps can be submersible, sitting inside the tank, or external. They’ll give you the pressure needed to move water where you want it. Think about how you’ll use the water most often when deciding on your access method. You can find some great starter kits for rainwater harvesting that include these fittings.
Monitoring Your Water Levels
It’s easy to forget how much water you have until you really need it. Keeping an eye on your tank’s water level is pretty important. Some tanks come with a built-in gauge, which is super handy. If yours doesn’t, you can get simple float gauges or even more advanced wireless monitors that send readings to your phone. Knowing your water level helps you manage your usage, especially during dry spells. It also tells you when you might need to clean out your system or if there’s an unexpected leak.
Don’t get too caught up in making it perfect right away. The goal is to get a working system. You can always upgrade or tweak things later as you learn more about how you use the water and what works best for your setup. It’s a process, and the most important part is getting started.
Here are a few things to consider for managing your water:
- Overflow Management: Where does the water go when the tank is full? Direct it away from your house.
- Water Quality: Think about filters, especially if you plan to use the water for anything beyond basic garden watering.
- Usage Planning: How much water do you typically use for your garden or other tasks? This helps you gauge how much you need to collect and store.
So, You’ve Built Your Rainwater System!
And there you have it! We’ve gone from a pile of parts to a working rainwater collection system, all in just a weekend. It feels pretty good, right? We’re not just saving water; we’re doing our bit for the planet and maybe even saving a few bucks on the water bill. Remember, this is just the start. You can always tweak your setup, add more barrels, or refine your filters. Don’t be afraid to experiment and see what works best for your place. Now, the next time the clouds gather, you’ll know exactly where that free water is going – straight into your own storage, ready for your garden or whatever else you need it for. Happy collecting!
Frequently Asked Questions
How much water can we actually catch from our roof?
It’s pretty cool how much water your roof can catch! We can figure this out by multiplying the square footage of your roof by the amount of rain in inches, and then by 0.623. For example, if your roof is 1,000 square feet and we get one inch of rain, you could potentially collect around 623 gallons. Most of this water, about 75-85%, can be captured if the system is set up well.
What are the basic things we need for a rainwater system?
To get started, we’ll need a storage tank, like a rain barrel, to hold the water. We’ll also need parts to connect to our downspouts, like diverters and filters, to guide the water. Leaf guards are good for keeping out debris, and a spigot or pump makes it easy to get the water out. A first flush diverter is also helpful to skip the dirtiest water at the start of the rain.
How do we make sure our rain barrel is stable?
Since a full rain barrel can be quite heavy, we need to make sure it has a strong base. We can use concrete blocks or sturdy pavers to create a level platform for the barrel. This prevents it from sinking into the ground or tipping over, especially if the soil is soft.
What’s the best way to direct the water into the barrel?
We need to make sure our gutters have a slight tilt, about a 0.5% to 2% slope, so water flows easily. Then, we’ll modify the downspouts to send the water where we want it. Adding a diverter is like giving the water a clear path into the barrel, making sure less water is wasted.
Why is a ‘first flush diverter’ important?
The first bit of rain washes a lot of dust, leaves, and other gunk off the roof. A first flush diverter catches this initial dirty water in a separate pipe. Once that pipe fills up, the cleaner water is then directed to our storage tank. The diverter usually has a small hole that slowly drains the dirty water out after the rain stops, so it’s ready for the next rainfall.
Do we need special permission to set up a rainwater system?
It’s a good idea to check with our local town or city hall. Sometimes, we might need a permit, especially if we plan to connect the system to our house’s water supply. Some places even offer benefits like tax breaks for collecting rainwater. We also need to remember that only water from our roof is typically allowed for collection, not from driveways or lawns.


